
Basics of Crochet for Beginners
Before You Start
Learn more about reading a pattern. Explore
Reading A Yarn Label
-
Want to learn about a yarn? Look at the skein band or ball band on it! Keep reading this blog to learn how to read a skein band.
Follow along as we read a skein band! We're using Super Saver in our example. To start, position your yarn so the Red Heart logo is facing you.
Outside of Band

The big red heart on the skein band tells you this is Red Heart Yarn! Underneath the Red Heart name the logo tells you that this particular skein is our Super Saver yarn.
Above the logo a line says that the yarn is worsted weight, or a 4 weight in the Craft Yarn Council yarn classification system that we use.
Underneath the heart you can see the small American flag in the left hand corner indicating that the yarn is Made in the USA. On the right-hand corner is the fact that Super Saver does not have dye lots in solid colors. You can see this written in English, French, and Spanish. To meet regulations the copy on the ball band must be in multiple languages.
Turn the skein slightly away from you so you can see the picture of the free pattern. Your picture may be different than the one in our example. One type of yarn may have the same pattern on all of the skein bands or it may have different patterns on different skein bands. Which pattern is on any particular skein of yarn is just due to chance.

At the top of the skein band in this shot you can see a red line where it gives the net weight and the yardage for this skein. In the US yarn is sold by weight, so this skein is 7 ounces or 198 grams. The yardage given is an estimate and is the least amount of yarn you will encounter in the skein; the actual amount may be more. Since yarn is sold by weight and not by yardage no two skeins of yarn will have the exact same yardage.
The picture shows the free pattern available on the inside of the ball band. This particular free pattern is for the Double-Sole Slippers; the picture has the pattern number superimposed on top of it. The white box to the left of the pattern picture has a crochet hook, so you can tell this is a crochet pattern. Other skein bands may have an image of crossed knitting needles to tell you that the free pattern is knit. The numbers printed in the white box indicate the size of the crochet hook (or knitting needles, for other patterns) used in the free pattern. This particular free pattern uses a 5.5mm [US I-9] crochet hook. Below the white box the number of skeins needed for the picture and the color shown in the picture are listed. This pattern uses 1 skein of 319 Cherry Red.
Social media logos are listed below the pattern information. If you go to YouTube, Facebook, or Twitter, you will be able to find Red Heart Yarns accounts.
Below the pattern picture is our website, then you get to the technical information: the manufacturing details of the yarn, our address, manufacturing and recycling information for the paper, and the importing information for our business in Mexico.

If you continue turning the skein you'll see a white sticker holding the ends of the skein band together. The sticker gives the name of the yarn color above the article number and the color number. For this skein the color is Cherry Red, the article number is E300, and the color is 0319. The other numbers show when it was manufactured. Super Saver does not have any dye lots in solid colors, but yarns that do have dye lots have the dye lot information also printed on the skein band. The bar code allows the skein to be identified and for you to buy it at the store.

If you turn it away from you again, underneath the "No Dye Lot" notice are the yarn information, gauge, and washing instructions.
Left to right, the boxes are for:- This yarn has a weight of 4 in the Craft Yarn Council classification system.
- The gauge of this yarn with 5mm/US 8 knitting needles is 17 stitches and 23 rows in 4"x4" (10 cm x 10 cm).
- The gauge of this yarn with a 5.5mm/US I-9 crochet hook is 12 single crochets and 15 rows in 4"x4" (10 cm x 10 cm).
- This yarn can be machine washed.
- This yarn can be tumble dried.
- You should not use an iron on this yarn.
The general laundry instructions and the fiber content of the yarn (100% acrylic) are listed next.
The next set of pictures shows you that this yarn is a skein, and that you can pull it from the center. For more details on this, please see our blog on the difference between balls and skeins of yarn. Now you're back at the beginning!
Inside of Band
To look at the inside of the band, slide the band off of the skein. At the white sticker carefully pull so the band opens flat without ripping. The inside of the band has a written pattern for the image on the outside of the band. The pattern is given in French and English. You can also find the pattern on our website by searching the number that is shown on the picture.
What other questions do you have? Let us know in the comments!
Choosing the Right Yarn
-
Everyone talks about yarn weight — what does it mean? When we refer to yarn weight, we're not talking about the weight of the ball or skein. Instead, we're talking about how thick or thin yarn is.
Yarnspirations follows the Craft Yarn Council (CYC) Standard Yarn Weight System. In this system, yarn is divided into weights 0 to 7. The thinner the yarn, the smaller the number. For example, Aunt Lydia's Classic Crochet Thread Size 10 would count as a size 0 (Lace). Red Heart Super Saver, Caron One Pound and Bernat Super Value are all size 4 (Medium), and Bernat Plush Big is a size 7 (Jumbo).
Just because yarn is the same weight doesn't mean it is identical: Red Heart Super Saver, Caron One Pound, and Red Heart Soft all have a weight of 4, but they are slightly different sizes and have slightly different gauges. Each weight of yarn has a range of similar gauges.
Each of our yarns has the symbol for their weight on the ball band. You can search our yarn by weight on the website: click on "Yarn" in the top navigation bar, and then select the weight you need under the "Weight" column.
If you want to substitute yarn in a pattern, weight is one component. It is easiest to substitute between yarns of the same weight, such as using Red Heart Super Saver or Caron One Pound in a pattern. You will still need to check the pattern gauge, however, to make sure that the project you are making will turn out the correct size.
Lace Weight

Lace weight yarn also known as fingering yarn and 10 count crochet thread is very thin yarn used for lacy projects such as doilies and lace shawls.
Super Fine

Super fine yarn may also work for lace projects since it is great for creating delicate garments. Super fine yarn is commonly used to make socks, shawls and baby items. Shop super fine yarns.
Fine

Fine yarn often referred to as Sport Weight yarn is also great for creating lightweight and delicate projects. It works well for making socks, heirloom garments and lightweight blanket.Shop sport fine yarns.
Light

Light yarn is slightly thicker than a #2 Fine yarn, it is considered a lighter worsted weight yarn that’s great for making heavier, fine garments and baby items. Shop light (DK) yarns.
Medium

Medium weight yarns are often referred to as Aran or Worsted Weight yarn. Worsted weight yarn is the most frequently used yarn since it is easy to work with. It’s a great yarn for beginners and for those looking to make a variety of projects. Shop Medium weight or worsted weight yarns.
Bulky

Bulky yarn or chunky yarn is almost twice as thick as worsted weight yarn and is great for making scarves, hats, sweaters, and blankets. Due to its thickness this yarn works up quickly when using large hooks or needles. Looking to make a project with a bulky yarn? Shop bulky weight yarns.
Super Bulky

Super Bulky yarn or Roving yarn is thicker and works up quick! This kind of yarn is great for making warm and cozy sweaters, hats, and cowls. Shop super bulky yarns.
Jumbo

The thickest of yarns classified in the Yarn Weight Standards by the Craft Yarn Council. This yarn category was created to classify the trending super thick yarns which started to appear in the yarn world. These jumbo yarns are great for quickly making sturdy and large projects. Start stitching with Shop jumbo weight yarns!
Every pattern either dictates the yarn you need to use to make the project or the yarn weight. This means that you have the option of making a project in the yarn you want by simply switching to a different yarn with the same weight originally called in the pattern. An important thing to note if you choose to switch out one yarn for another when working on a project is to make sure you create a gauge swatch. While most yarns within a yarn weight category are interchangeable not all yarns are identical that’s why it’s helpful to create a gauge swatch, so you can get a sense of the tension you’ll need to maintain in order to achieve the right amount of stitches per inch.
Everyone talks about yarn weight — what does it mean? When we refer to yarn weight, we're not talking about the weight of the ball or skein. Instead, we're talking about how thick or thin yarn is.
Yarnspirations follows the Craft Yarn Council (CYC) Standard Yarn Weight System. In this system, yarn is divided into weights 0 to 7. The thinner the yarn, the smaller the number. For example, Aunt Lydia's Classic Crochet Thread Size 10 would count as a size 0 (Lace). Red Heart Super Saver, Caron One Pound and Bernat Super Value are all size 4 (Medium), and Red Heart Grande and Bernat Mega Bulky is a size 7 (Jumbo).
Just because yarn is the same weight doesn't mean it is identical: Red Heart Super Saver, Caron One Pound, and Red Heart Soft all have a weight of 4, but they are slightly different sizes and have slightly different gauges. Each weight of yarn has a range of similar gauges.
Each of our yarns has the symbol for their weight on the ball band. You can search our yarn by weight on the website: click on "Yarn" in the top navigation bar, and then select the weight you need under the "Weight" column.
If you want to substitute yarn in a pattern, weight is one component. It is easiest to substitute between yarns of the same weight, such as using Red Heart Super Saver or Caron One Pound in a pattern. You will still need to check the pattern gauge, however, to make sure that the project you are making will turn out the correct size.
Get to Know Your Crochet Hook
-
When learning to crochet, it’s always best to start out with a solid understanding of the tools you’ll need to successfully take on this craft. Crochet hooks can come in an array of sizes and materials, while also having plenty of different styles to choose from. Below, we’ve created a guide to help you better understand the world of crochet hooks and help you pick the right one for your first project.
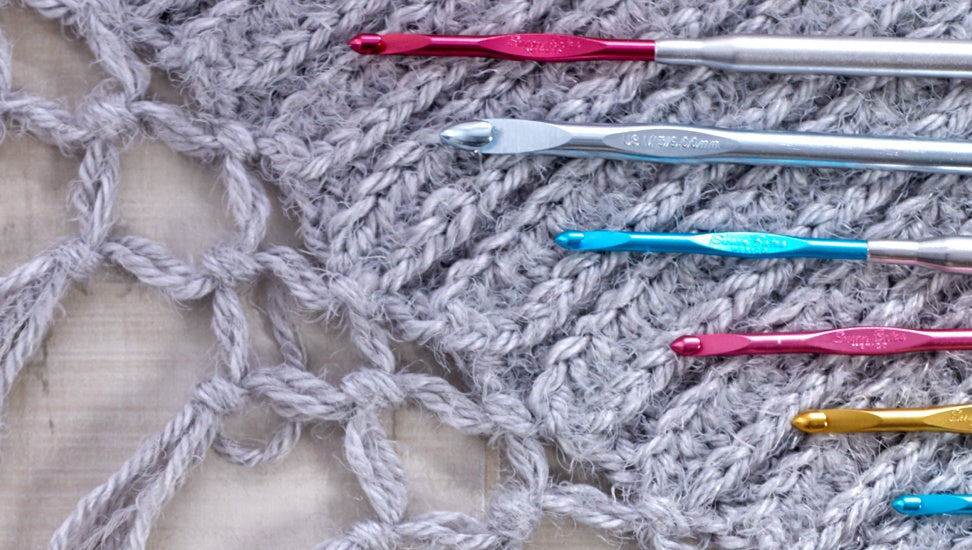
Tapered hook vs. In-line hook
A crochet hook has a long slender handle with a hook at one end that helps pull yarn through loops and form crochet stitches. The stitches then pass from the throat of the hook onto the shaft. While all hooks have the same basic anatomy, there are subtle differences in shaping that can alter the way that yarn passes along the hook and how the hook navigates the stitches. The head of the hook can be either rounded or pointed; a rounded head can be ideal when working with a plied yarn that might be prone to splitting, whereas a pointed head can work well when you are crocheting a very dense fabric. Some hooks can also have different throats, which isthe part of the crochet hook just below the top of the actual hook. This can be either an in-line throat or a tapered throat. An in-line hook has more of a rigid decrease which tends to have a snug hold on the yarn, a tapered throat is smoother and allows the yarn to slip off more easily. Typically, a tapered hook is easier for a beginner to use as the yarn doesn’t slip off your hook as easily this means a tapered hook is also great to use when working with a finer weight yarn. While tapered hooks are suggested for beginners this doesn’t mean a beginner shouldn’t use an in-line hook, it’s always best to use whichever hook you feel most comfortable with.
Find tapered and in-line crochet hooks here.
Crochet Hook Materials
Wooden Crochet Hooks
Wooden crochet hooks can be more expensive than metal or plastic hooks however, wooden crochet hooks are the smoothest crochet hooks and havea natural warmth to them. A cheaper alternative to traditional wooden crochet hooks is bamboo crochet hooks. These crochet hooks are lightweight and smooth while still having enough texture to prevent the yarn from slipping off your hook too easily. For these reasons bamboo crochet hooks are great for those just starting to crochet.
Find wooden crochet hooks here.
Metal Crochet Hooks
Metal crochet hooks are the smoothest crochet hooks out there, the yarn easily glides on and off the hook making for quick crocheting. With such glide to the yarn when crocheting with a metal crochet hook you will most often see more experienced crocheters use these hooks which much ease and comfort. However, beginners should not be intimidated by these crochet hooks as in some cases a beginner may find the smoothness makes it easier for them to achieve proper tension if they find themselves crocheting too tight. Most crochet hooks are made with aluminum and tend to be lightweight, although not as light as bamboo crochet hooks. In some cases, you will find smaller crochet hooks, reserved for thread crochet, are made of steel.
Find metal crochet hooks here.
Plastic Crochet Hooks
The most inexpensive type of crochet hooks, plastic crochet hooks are great for those just starting to crochet. They are the most lightweight type of crochet hook to start out with and have a slight texture to them, so they are not as smooth as metal crochet hooks. This lightweight crochet hook is great for working on large projects in bulky yarns as the hook barely adds any weight to your growing project and makes it easier to manipulate your stitches.
Find plastic crochet hooks here.
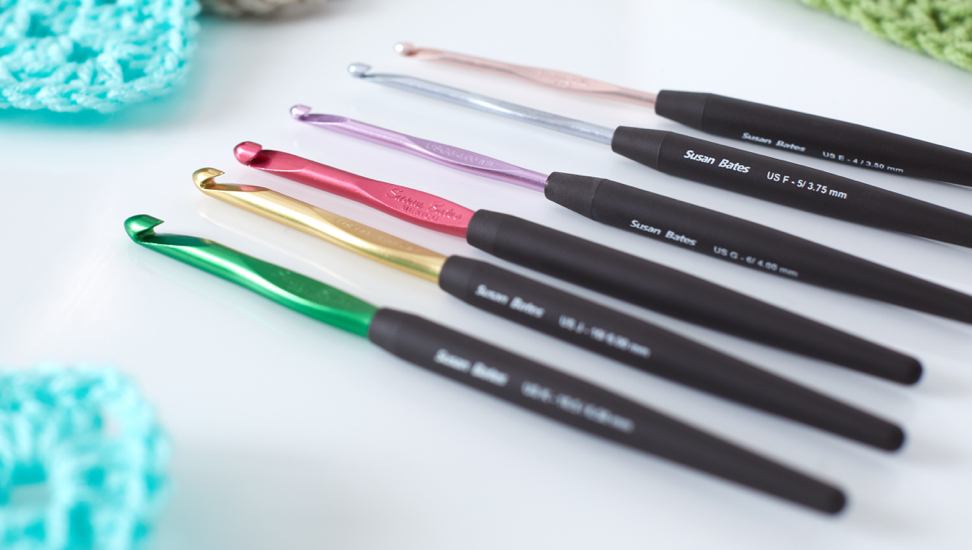
Standard vs. Ergonomic Crochet Hooks
While crocheting can be a therapeutic hobby there is no denying that the same repetitive movements which bring such joy can also introduce hand fatigue. For those experiencing hand fatigue when crocheting or have chronic pain and are prone to repetitive strain injuries, an ergonomic crochet hook might be helpful in alleviating any discomfort or pain you are experiencing. Ergonomic crochet hooks can be bought in all three types of crochet hooks discussed above with either a tapered or in-line throat. Alternatively, you can turn your favorite hook into an ergonomic one. Grips are great for those crocheters out there who can’t bear to part with their favorite crochet hook as you can easily place these grips over existing hooks.
Find ergonomic crochet hooks here.
Different Crochet Hooks for Different Types of Projects
Tunisian Crochet
This type of crochet is different enough from traditional crochet as it requires a specific Tunisian crochet hook. Tunisian crochet is often referred to as Afghan crochet, this type of crochet requires an elongated crochet hook with a stopper on the end. Tunisian crochet combines crochet and knitting skills and creates wonderfully textured stitches resulting in dense and plush fabric, often mistaken as knitting.
Find Tunisian crochet hooks here.
Broomstick lace
This type of crochet work involves the use of a very large crochet hook, a large plastic crochet hook works just fine for broomstick lace crochet. Broomstick lace sometimes referred as jiffy lace or peacock eye crochet is a style of lace crochet from the 19th century. This type of lace crochet makes use of a larger sized crochet hookor dowel to create large eyelet motifs throughout your stitches, resulting in stunning lace crochet work.
Find broomstick crochet hooks here.
Crochet Hook Sizes
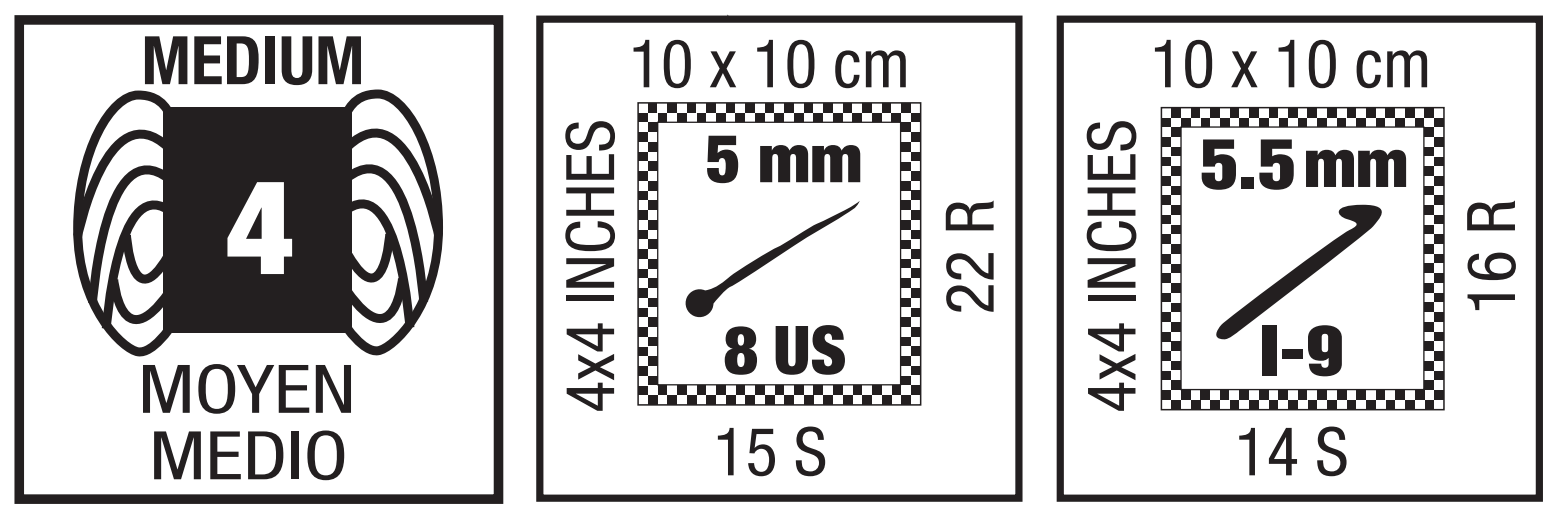
Your crochet hook size is determined by the yarn you are using, the gauge you want to achieve, and the type of stitch pattern you are working. All patterns and yarns will suggest the crochet hook size you will need to make a project or work with a specific yarn. This suggestion from both the pattern and yarn itself is a guide to help you obtain proper gauge. Gauge is the amount of crochet stitches you need to make per inch. This ensures that your tension is correct when making a project so that your finished project looks as intended. You can find yarn gauge and recommended crochet hook size on a yarn page or on a yarn’s label. These can be represented as symbols like the ones down below.
Find crochet hooks in a number of sizes here here.
Different Ways to Hold Your Crochet Hook
If you’re looking to learn to crochet it can be useful to understand the two most common ways of holding your crochet hook. Neither is better than the other, however, it is helpful to know that there are different ways to hold your hook because it can help you feel more comfortable when crocheting.
Pencil Grip
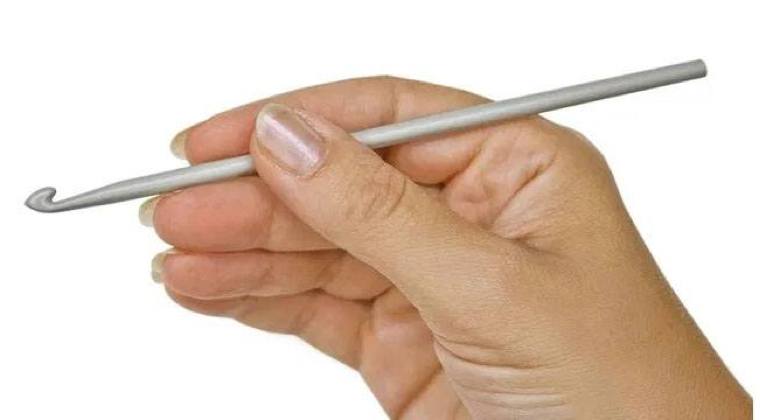
As the name implies the pencil grip method of holding your hook is like how you would hold a pencil in your dominant hand. With the crochet hook facing you, your index finger and thumb will grip the hook while the rest of your fingers act as a support.
Knife Grip
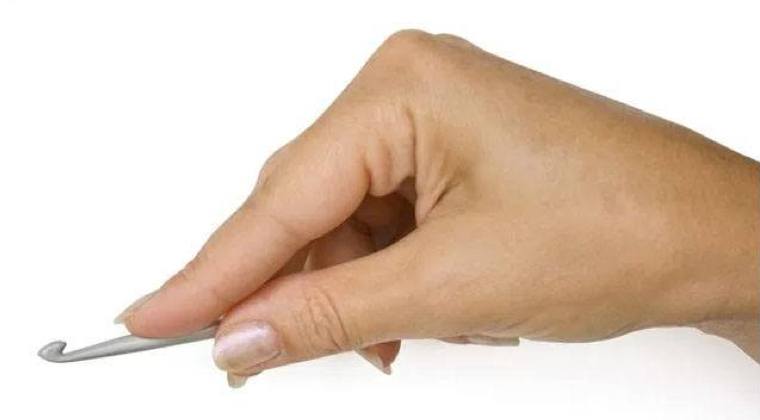
The knife grip is like holding a knife when cutting your food. With the crochet hook facing you, your middle finger and thumb will grip the shaft of the hook while you place your index finger along the top.
The best thing to do when starting to crochet is to try both ways of holding your crochet hook so you can choose the grip that’s most comfortable for you. Often you will also find it easier to work new stitches if you simply adjust or change how you are holding your hook. The same can be done if you are experiencing fatigue or discomfort in your hands while crocheting. Check out our video tutorial below as we show you the two different ways to hold your crochet hook.
Getting Started
Prepare your stitching for success. Explore
How to Hold The Hook
-
There are no hard and fast rules about the best way to hold the hook and yarn. Choose whichever way you find the most comfortable.
Some people prefer the "pencil grip". The hook is held in the right hand as if holdinga pencil.
Some people prefer using the "knife grip". The hook is held in the right hand as if holding a dinner knife ready to cut.
To maintain the slight tension in the yarn necessary for easy, even stitches, you may find it helpful to wrap the yarn around the fingers of the hand opposite the one holding the hook. Try one of these ways or find another way that feels comfortable to you.
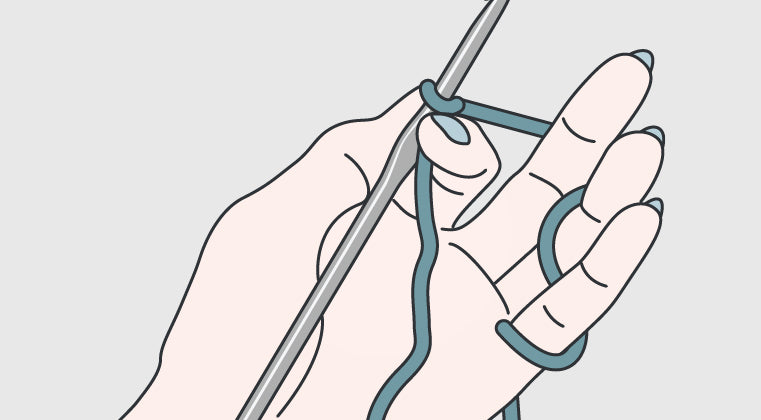
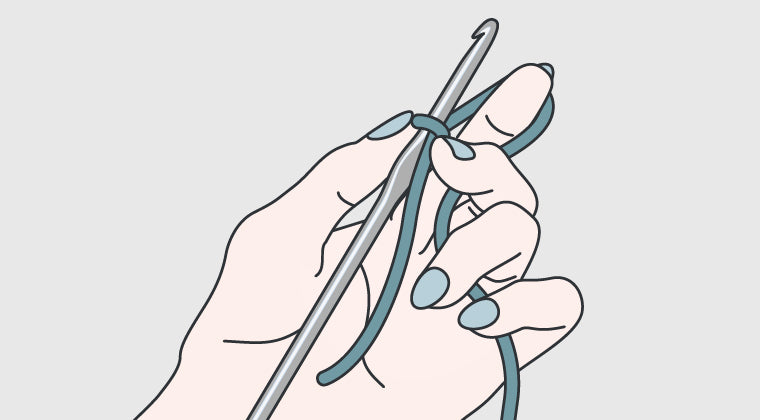
In the illustrations above, the left hand holds your crochet work and at the same time controls the tension of the yarn. The left-hand middle finger is used to manipulate the yarn, while the index finger and thumb hold on to the work.
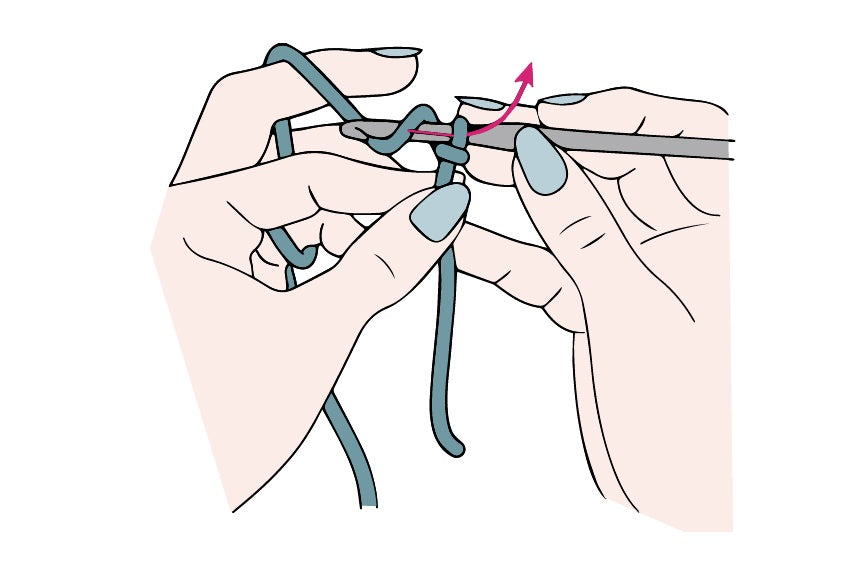
Some people find it more comfortable to manipulate the yarn with the index finger and hold the project with their thumb and middle finger. While you're learning, if one way feels awkward, try another way until you find the one that suits you.
Slip Knot Crochet
-
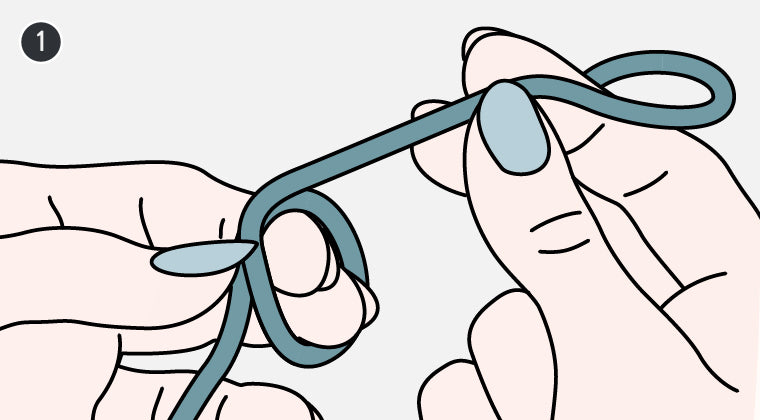
Step 1
Make a circle with yarn or thread.
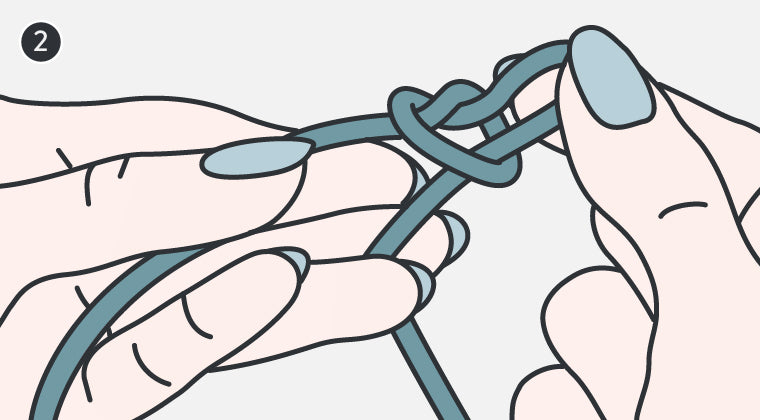
Step 2
Pull a loop through the circle.
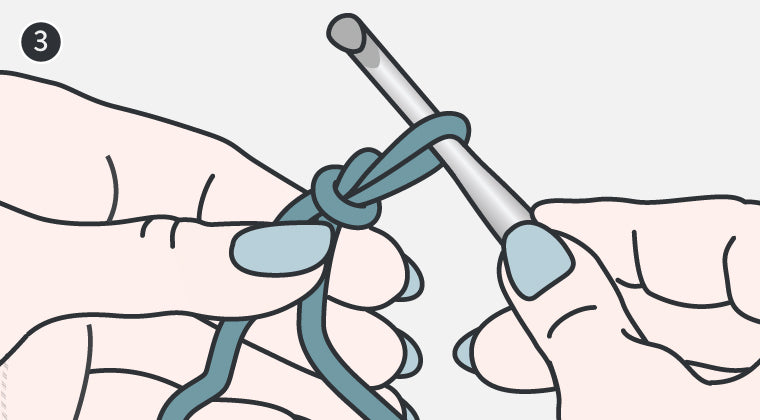
Step 3
Insert the hook in the loop.
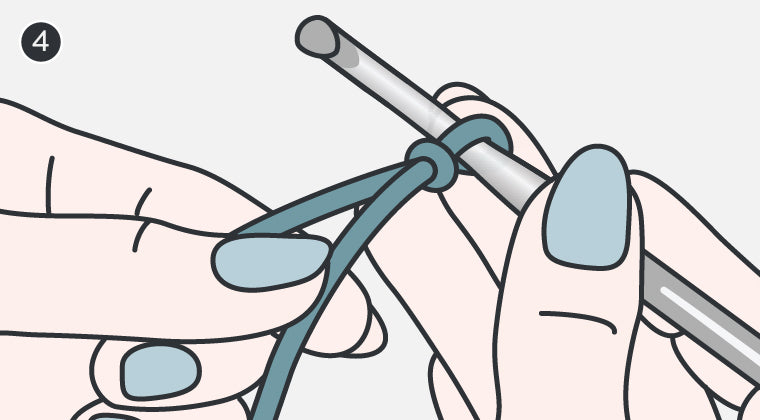
Step 4
Pull gently and evenly to tighten the loop and slide the knot up to the hook. You want the loop to be able to move easily on the hook but be snug around it. Take care that the loop stays on the wider part of the hook and is not on the thumb rest or the narrow part near the head.
Yarn Over
-
Wrap the yarn from back to front over the hook (or hold the yarn still and maneuver the hook). This movement of the yarn over the hook is used over and over again in crochet and is usually called "yarn over", abbreviated as "yoh".
Check out these stitches that use the yarn over hook movement:
-
Bobbles
-
Single crochet two together stitch (sc2tog) (also known as a single crochet decrease)
-
Double crochet back post (dcbp)
-
Double crochet front post (dcfp)
-
Chain
-
Almost all crochet begins with a foundation chain, which is a series of chain stitches beginning with a slip knot. You then work the first row of other stitches into the chain to start making crochet fabric. The foundation chain is also called a base chain or starting chain.
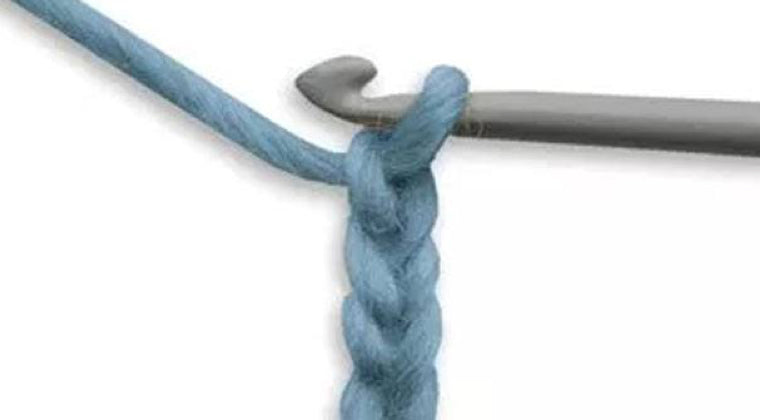
To work a foundation chain, start by making a slip knot.
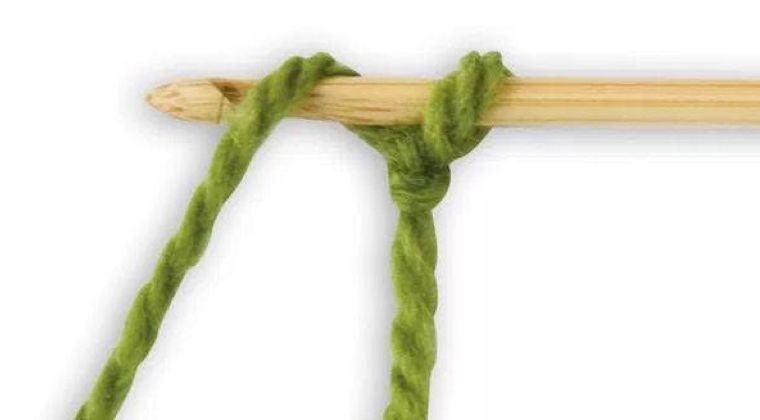
Then chain as many stitches as the pattern calls for.
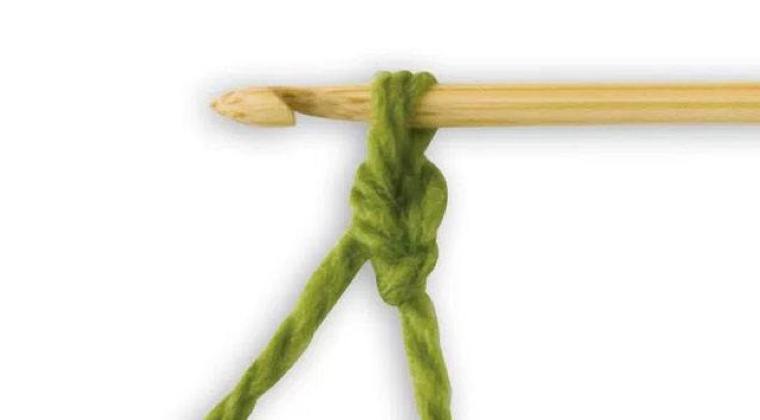
Next, start working stitches into the chain. You can use double crochets, or any combination the pattern tells you to use.
When working into the starting chain, you may work under one or two strands of chain loops as shown in the illustration. Either of these methods forms an even, firm bottom edge.
Some people like to work into the "bump" on the back of the chain. This forms an even, stretchy bottom edge that is ideal for garments. It also produces an edge that looks more similar to the final edge of your project, making it useful for projects where both ends are exposed, such as scarves.
Whichever method of working into the foundation you choose, be consistent. Work all the pieces of a project in the same manner.
Stitches: How To
Check out more stitches and tutorials. Explore
Single Crochet
-
Single crochet is the most common basic crochet stitch that will result in fabric. It is abbreviated sc.
Step 1
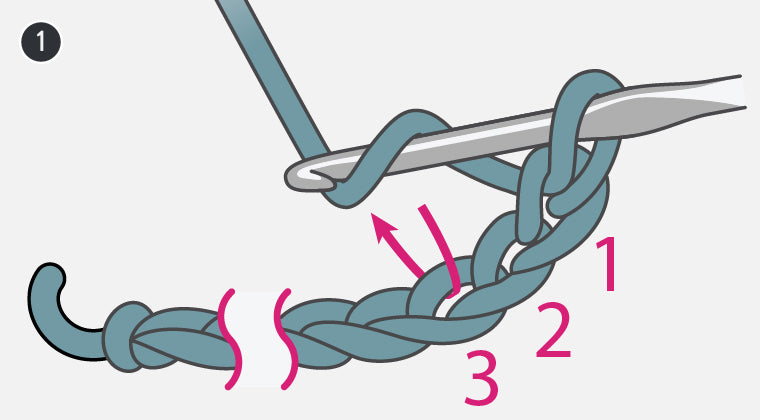
Insert the hook into the work (second chain from hook on the foundation chain,*yarn over and draw yarn through the work only.
Step 2
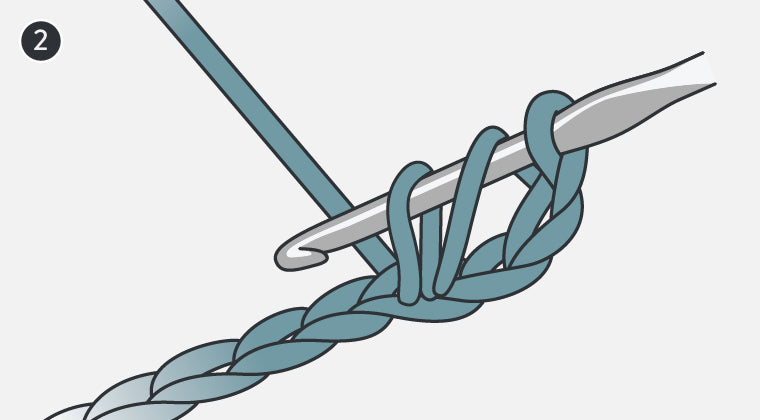
Yarn over again and pull the yarn through both loops on the hook.

Step 3
One single crochet made. Insert hook into next stitch; repeat from * in step 1.
Turn
Half Double Crochet
-
Half double crochet is in between the height of single crochet and double crochet, and it is made using aspects of both. It is abbreviated hdc.
Step 1
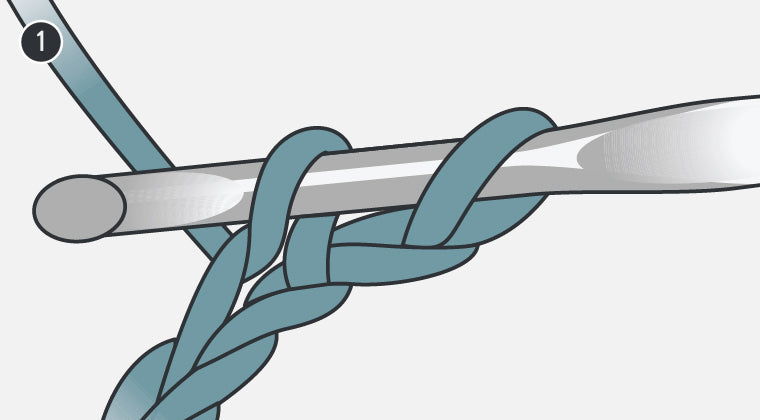
Yarn over and insert the hook into the work (third chain from hook on the starting chain).
Step 2
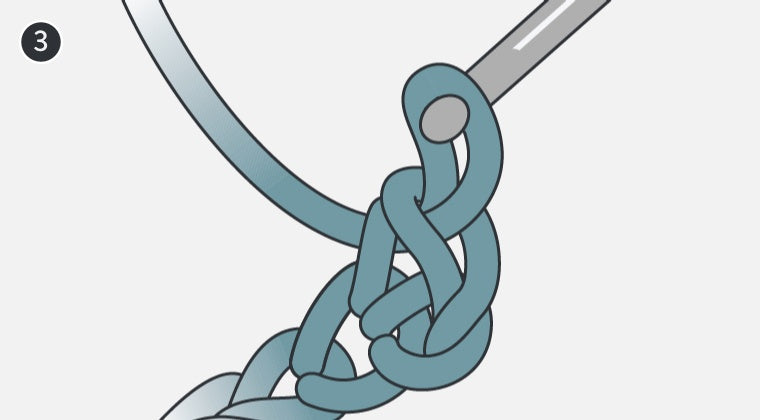
* Yarn over and draw through pulling up a loop.
Step 3
Yarn over again and pull yarn through all three loops on the hook.
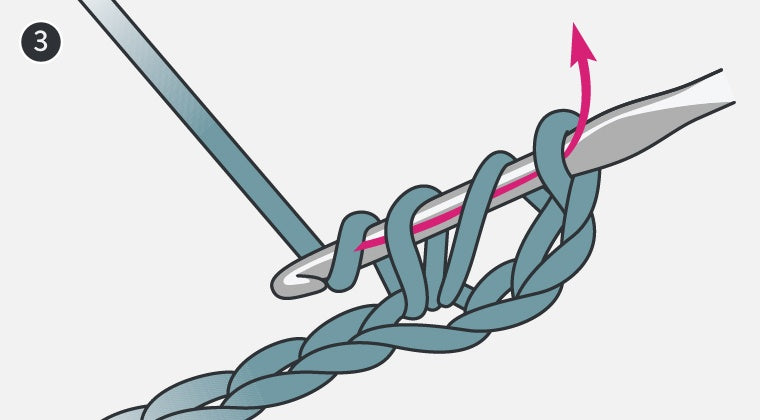
Step 4
One half-double crochet made. Yarn over, insert hook into next stitch; repeat from * in step 2.
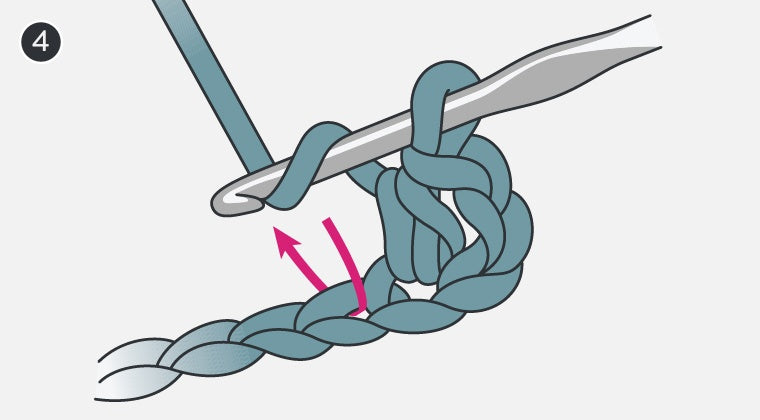
Double Crochet
Step 1
Read more. Yarn over and insert the hook into the work (fourth chain from hook on starting chain).
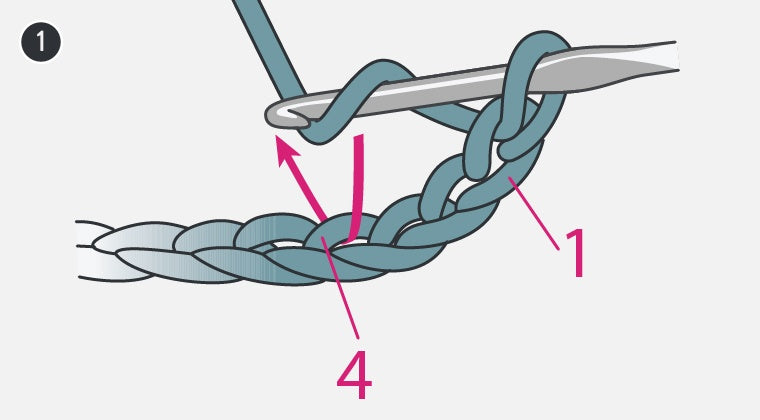
Step 2
* Yarn over and draw yarn through, pulling up a loop.
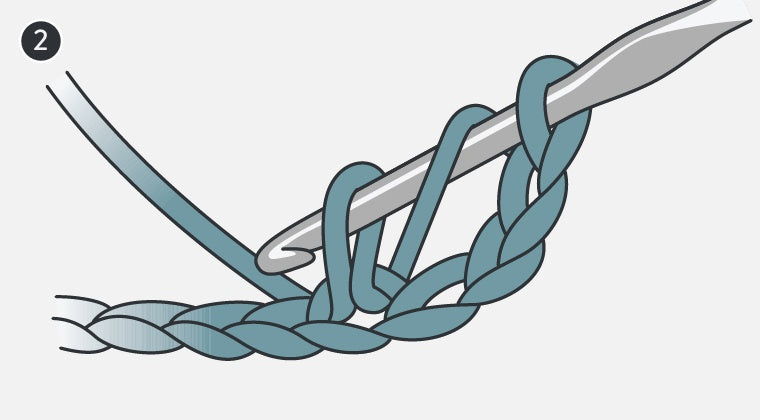
Step 3
Yarn over and pull yarn through only the first two loops on the hook.
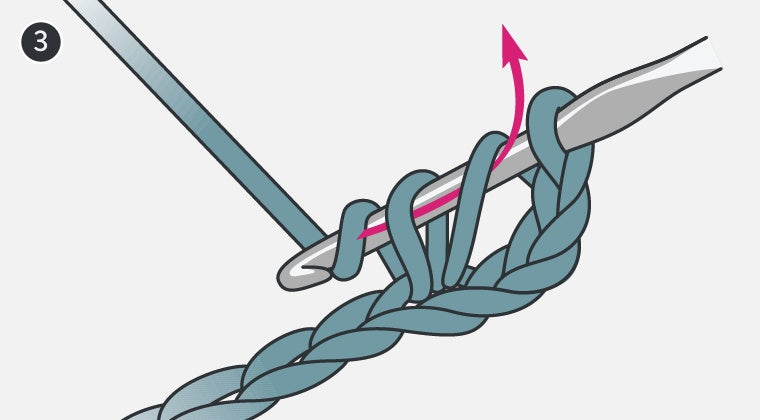
Step 4
Yarn over and pull yarn through the last two loops on the hook.
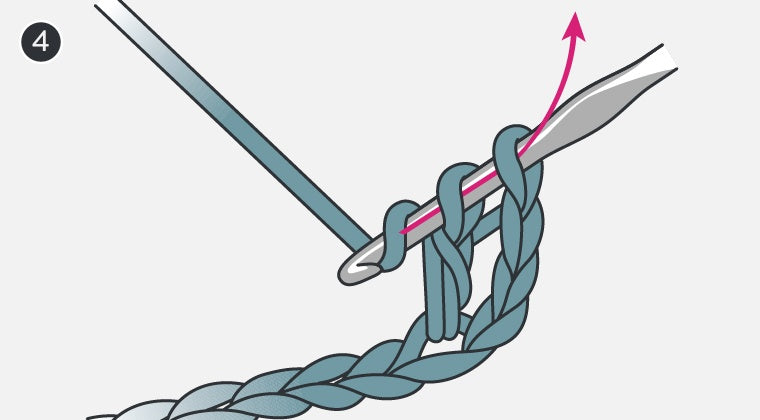
Step 5
One double crochet made. Yarn over, insert hook into next stitch; repeat from * in step 2.
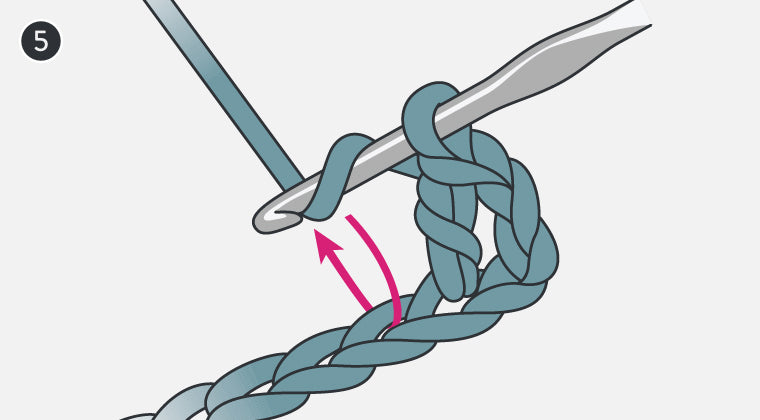
Slip Stitch Crochet
-
Slip stitch is the shortest of all crochet stitches. Unlike other stitches, slip stitches are not often used on their own to produce a large piece fabric. The slip stitch is used for joining, shaping and, where necessary, to move the yarn to another part of the fabric for the next stage.
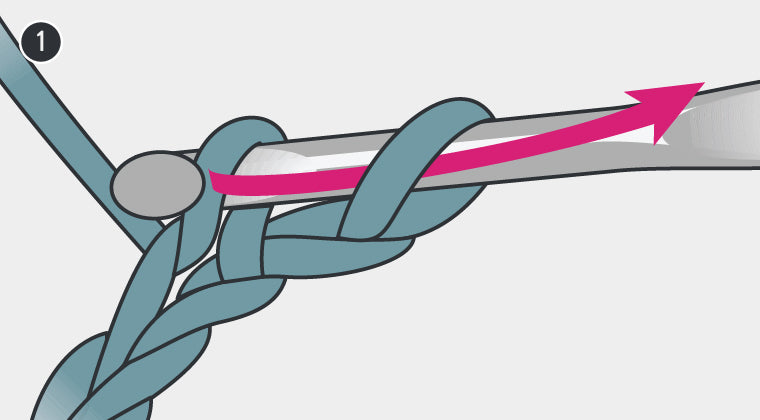
Step 1
Insert the hook into the work as directed in the pattern. Yarn over and the pull yarn through the work and the loop on the hook in one movement.
Step 2
When working into previous rows, yarn over and pull the yarn through both the work and the loop on the hook in one movement.
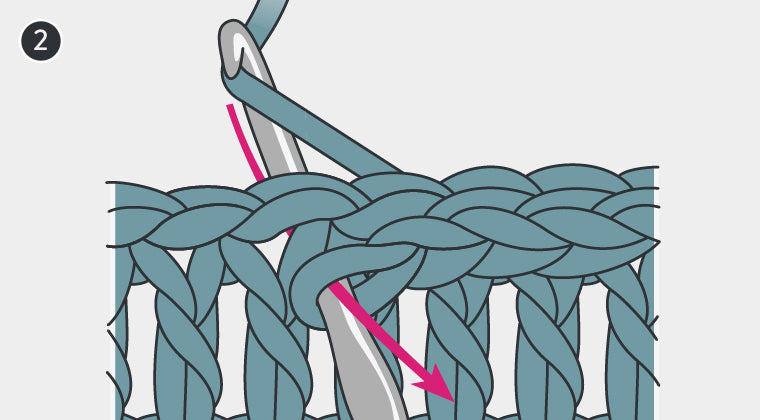
Step 3
To join a chain ring with a slip stitch, insert the hook into the first chain, yarn over and pull the yarn through the work and the loop on the hook.
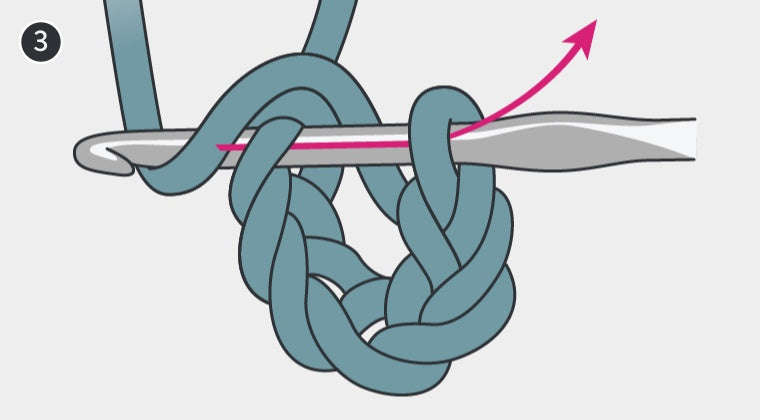
Slip stitches may be used to make stretchy crocheted ribbing.
To make ribbing, start by chaining for the width of the item, not the length. For example, if you are making a hat brim, you would crochet just a few stitches for the width of the brim, not the number of stitches needed to go all the way around your head.
Next, slip stitch into the back loop only of each chain across the row.Read more.
Chain one and turn at the end of therow.
Again, work into the back loop only of each stitch across the row, then chain one and turn. Repeat this row as many times as you would like to make the fabric the size you want.


